Sunday, December 8, 2013

Family Cornbread

It has come to my attention that I said that I would write about Cornbread next.  Okay, I didn't, but I'll make it up now.  Both Granny and Memaw made cornbread the same way.  (I think this is the only recipe where I can say this!)  The difference is that Memaw made cornbread every single day.  When you went into her kitchen, she usually had fresh cornbread staying warm on the stove along with a simmering pot of beans.  (In the summer, it was usually string beans.  In the winter, she generally had pinto beans or the like.)

Laura modeling with two pans of perfectly prepared cornbread.
Here are some non-negotiables:
  • You shall only use white cornmeal to make cornbread.  Granny, Memaw, and Mom used Quaker White Cornmeal.  I cannot find it here so I use Indian Head White Cornmeal.  The white cornmeal used in Mexican cooking will change the outcome a bit.
  • You shall look upon anyone who suggests adding sugar to the cornbread with absolute distaste as sugar in cornbread is JOHNNY CAKE and not proper CORNBREAD.  Dammit.  It is your family duty to ensure that anyone who knows you well-enough to make such a garish suggestion is set right and will never again entertain this line of thinking. 
  • You need a cast iron skillet that is really reserved for cornbread.  This will be well-seasoned and washed with salt and dried in the oven after each use.  Should you ever scrub it, you will re-season it.
  • Granny and Memaw used real bacon grease to prevent sticking.  Mom used Crisco.  (I often use Olive Oil and marvel that I still live.  I am certain that I breathe only because none of them ever knew I did this.  It may be that I'm not making "proper" cornbread.)  :) 
Mom, Granny, and Memaw used Morton's Iodized Salt.  Either works just as well.

 Okay, so to make a small pan of cornbread, you will need about a cup of white cornmeal, about two tablespoons of all-purpose flour, 1/2 teaspoon of salt, 1/2 teaspoon of baking powder, 1/2 teaspoon (plus a pinch) of baking soda, one egg, and one cup of cultured buttermilk.  (To make a large pan of cornbread, double everything above except for the egg.)   You will also need enough grease to coat the bottom of the skillet.

Dry Ingredients and an egg.  Just add buttermilk!
Preheat the oven to 350 degrees Fahrenheit.  Gather your ingredients.  Warm your skillet over medium heat on the stove.  Combine all ingredients, and beat everything together until it is lump-free and foamy.  It should flow like pancake batter.  Add a bit of buttermilk if it is too thick and a bit of flour or cornmeal if too soupy.

Add the grease to the warmed skillet.  If you do not pre-warm the skillet, the cornbread will stick.  Actually, it will weld to the bottom of your skillet.  (If you do it all correctly and it still sticks, it may be time to clean your skillet with some salt and elbow grease, and oil it again before putting it away...or maybe you need to remove everything down to bare metal and re-season your skillet.)

When the grease seems to shimmer, it is hot.  Pour the batter all at once into the skillet and place in the oven to bake for 25 minutes or until browned. Once it is done, invert the pan over a plate.  If it sticks, use a butter knife to go around the edge and try to gently pop the loaf onto the plate.

Let it cool prior to adding to dressing breads.
It's the base for our cornbread dressing and also goes with so many things beyond beans!  Like deer stew, for example.  Just ask Laura.

FAQs:
  • Is it proper to butter cornbread?
  • Yes, but you should slice it open and butter within otherwise the butter drips onto your fingers.
  •  Is it allowed to crumble cornbread into beans, soups, etc.?
  • Not only is it allowed, but it is highly encouraged.
  • Grandpa use to crumble cold cornbread in a glass and then poured milk on it!  Then he would offer me bites!  Is this okay?  (This was a favorite of Dad's father, who we called Grandpa.)
  • He must have loved you very much to share one of the best old-fashioned uses for cornbread.  Did you try it?  If not, you should!
  • How long is cornbread safe to eat?
  • It's always been gone within a day around here.  It's fine at least until then.  Probably a few days more, but the world may never know.
  • Can you recommend an especially yummy way to eat cornbread?
  • While cornbread is delicious on its own, I love it lightly buttered and eaten with a bit of raw scallion.  A bit of cornbread, a bite of scallion.  Slip a few bites of tomato and dinner in the summer is perfect!
  • Seriously, how long does it take to make cornbread?
  • Once you know what you are doing, it takes perhaps 3 minutes of preparation and is done in 25 minutes.
  • What's a perfect kitchen gift for beloved nieces and nephews who have not given holiday suggestions?
  • Lodge cast iron skillets.  Hmmm.

Obviously a perfect Christmas gift.  Now practice making cornbread!  ;)

Monday, December 2, 2013

Whole Cranberry Sauce Inspired by Mom Burch

Mom and Pop Burch were Pepaw's parents.  Pepaw always missed Mom Burch's cornbread, but Granny never thought much of it, which means that she never learned to make it.  It has been said that Mom Burch made terrific cranberry sauce, but Granny liked jellied cranberry sauce and I always remember having the canned variety.  (Again, this means that Granny never learned to make Mom Burch's recipe.)  Sadly, Mom Burch passed before I remember tasting it and no one seemed to have the recipe.  Pepaw said that Mom Burch's cranberry sauce was loaded with berries and the sauce was both sweet and tart.  He also said that it had the best lingering taste of oranges, but he did not recall there being oranges in the sauce.  Not having many recipes from Mom Burch, I had to try to recreate it.

All of the recipes that I have from Mom Burch do not spare on sugar, butter, etc.  The ingredients are fresh and she would purchase the best available.  I remember a Christmas tree at Mom and Pop Burch's home that had a tinsel made of popcorn and cranberries, so I know she had access to fresh cranberries.  That is where I started.  I've tried extracts, juices, and fruit pulp.  Orange/tangerine zest seems to give the best results of what I've tried so far.  In fact, I'm satisfied with the recipe.  Here is how to make it:

Fresh Cranberries in the Pot with the Zest of a Tangerine
Select a pot that will give plenty of room for stirring.  Pick through the berries and discard any that are damaged or severely discolored.  Rinse the berries well.  For roughly one pound of fresh cranberries, add the zest of one orange or tangerine.  (I made ribbons of zest but, since Pepaw did not remember seeing any orange in the sauce, I believe Mom Burch grated it if zest was what she used.)  Squeeze the juice from the zested citrus into a coffee cup and add water to make a full cup.  (Avoid pulp.)  Pour the liquid in the pot along with an equal amount of sugar.  The water/juice/sugar mixture will come about half way up the heap of berries.  (If you want a less jellied sauce, add a bit more water.  Perhaps 1/4 cup.) Bring the mixture to a boil over medium heat and stir constantly.  Once it comes to a boil, lower the heat to a simmer and continue to stir for about 10-15 minutes.

Laura stirring up cranberry magic!
The berries will sound like popcorn at times as their skins split open, and the smell of cranberries and orange will make the kitchen smell great!  Pour the cranberry sauce into a Pyrex dish and allow to cool for 20 minutes or so before covering and placing in the refrigerator overnight.

Cranberry Sauce beginning to "gel."
It will look dark in the dish.  But, once you stir it, it will glimmer like bright red jewels on a plate....or spoon.

Still pretty bright and tasty days after Thanksgiving!
 I like to think this is what Pepaw remembered.  In any case, it is really good.  You could put it through a mill to remove seeds and pulp if you want to have cranberry jellied sauce without the fruit, but I've not tried to do that yet.  Also, this makes a quick, inexpensive, and tasty dish that compliments many things at a pot luck.  You won't go back to the canned stuff....unless Granny finds a way to misguide you!

A better picture of the color.

Thursday, September 5, 2013

Stuffed Green Peppers

Since my last post had stuffed green peppers, I thought I should write about them.  I tried to come up with a snazzy title, but Stuffed Green Peppers are perfection all on their own.  As someone who rarely has favorites, I can say that this is my favorite summertime food.  Of course, it is a family recipe.  Of course, there are different ways of making it.  Everything is estimated and the flavor changes depending on the quality or type of ingredients used.  Although my green peppers did not do well in the garden, I found a sack of them at the farmer's market for pennies on the pound.  With my bounty of tomatoes, I decided that stuffed green peppers had to be on the menu tonight.

The Basics


The basics are this:  Ground beef, rice, chili powder, tomatoes, onions, salt, pepper, and green peppers.  Mom and I preferred ground chuck in peppers.  A good tip is to watch the sales.  When chuck roasts go on sale, ask the butcher to grind a few roasts up for you.  I did that today.  I could either purchase 80-20 ground beef for $3.99/pound or chuck roast for $3.29/pound.  I like the roast route because I also know what meat is in it, and I can ask the butcher to remove the fat that is hard to the touch.  This usually gives me ground beef that is leaner than most and still is flavorful.

Today, I had a lot of tomatoes that were ripe in the garden.  Granny used Early Girl or Beefsteak tomatoes.  Mom liked Better Boy tomatoes.  Today, I used some Early Girls, Rutgers, Mortgage Lifters, and a few Black Cherry tomatoes.  The tomato ratio is generally a huge tomato to a pound of ground beef, but I used a variety since my tomatoes were pretty small.  (In the winter, when tomatoes are flavorless, I will add a small can of tomato sauce to the mix.)

Tomatoes and a Sugar Baby Watermelon
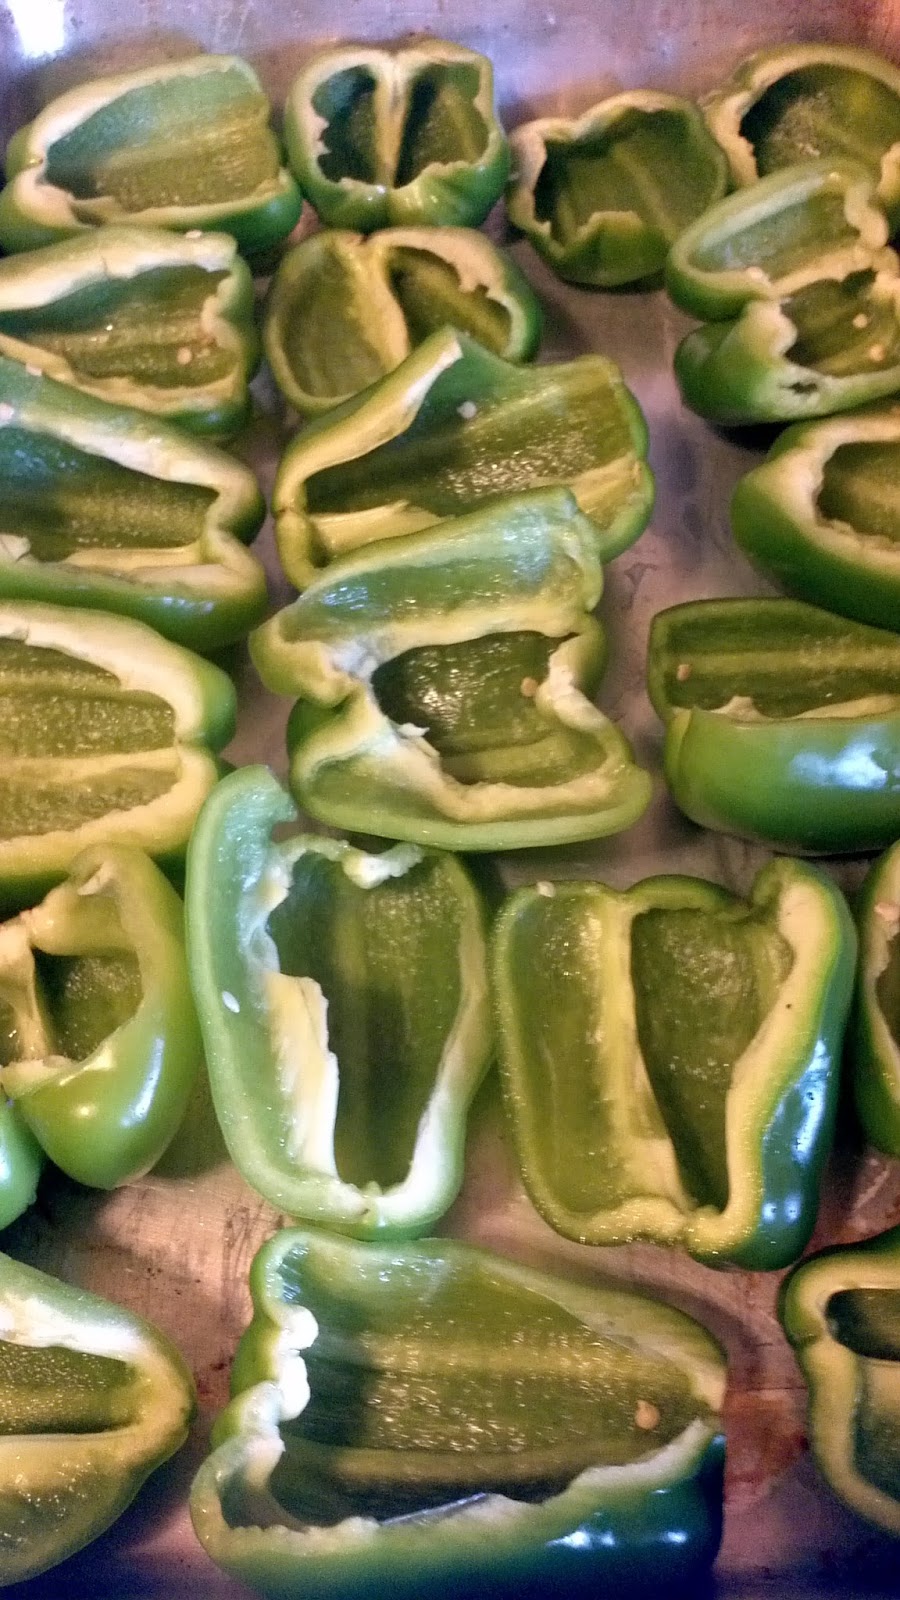
I prefer using four-lobed peppers, but the bag I received today were a mix of four and three-lobes.  Four lobed peppers rest better in the pan.  My choice was to hand-select four-lobes for 89 cents per pepper or buy a bag of mixed for $3.00.  Since I am my mother's child, I went for the less spendy of the two options.  Still, four-lobes do not roll around.  Wash the peppers, slice them into halves, and remove seeds and the white-pithy ribs.  By doing this step first, you can better select a pan that will fit best.  (By the way, who possesses Granny's granite ware roaster?  Not the big one, but the medium one.  It's perfect for peppers!)

Four-lobed peppers do not fall over!

Okay, here is where the nostalgia comes in: When I make a lot of peppers, I use Granny's big blue bowl.  I believe she got it when she set up house-keeping.  It's made of stoneware and was once heavily glazed in blue.  She used it so much that the glaze along the rim is  completely worn off.  I remember her using it for so many things and I use it for mixing up the stuffing for stuffed green peppers!

Granny's Mixing Bowl of Blue
So, you put everything but the green pepper in.  Ratios again.  To roughly a pound of ground beef, put a chopped medium onion, teaspoon of salt, tablespoon of chili powder, a cup of cooked rice, and maybe a half of teaspoon of black pepper.  Mix it all up.  If the beef does not wish to stick to itself, add an egg.  (I add an egg regardless of how much beef I use, but only one.  It never seems to need more.)  Keep in mind that all of these measurements are guesstimates.

Here is a bit of the history of the family recipe for stuffed green peppers:  Granny learned how to make green peppers from her mother.  Grandma Dora's recipe was identical to her meatloaf recipe except she used rice instead of oats.  Grandma Dora, according to Mom, did not use chili powder.  Granny said that she thought of adding chili powder when she was a young mother, but Mom insisted that she was the one who thought of adding chili powder when she was a teenager.  Neither would tell the other they were in the wrong, but each would simply announce that chili powder was their idea.  In either case, I've never had it without chili powder.....until today.

Family First!  Homemade Chili Powder!
I was out of chili powder, so I made my own.  Basically, I mixed 2 parts cumin, 1 part paprika, 1 part cayenne, 1 part dried oregano, and 1 part garlic powder.  It smells similar!  I've not tried it yet, but will give an opinion in comments when I do.  But that is what is essentially in chili powder!

Stuff the peppers.  I always "garnish" mine with a bit of tomato on top, but do not know why.  I know both Granny and Mom always wanted their peppers "pretty" and would take time to shape them before baking them.

Almost Ready to Bake
Add about an inch of water in the pan.  Cover and bake at 350 degrees Fahrenheit for about 90 minutes.  

Ignore the burned berry stain on the oven bottom!!!
Remove from the oven and uncover.

Pre-browned Peppers
Return to the oven.  The water will cook down a bit more and the tops will brown a bit more.  This will take about 20 minutes.

Granny was a seasonal cook.  I always knew what day it was by what was on the table.  She usually made stuffed green peppers on weekends and would serve them with mashed potatoes, corn on the cob, string beans, tomato slices, and sometimes cornbread sticks or dinner rolls.  I loved having a stuffed pepper as a sandwich the next day.  Just plain white bread and mustard.  The pepper and filling provided the rest.  It's an awesome sandwich!

One thing: No one's stuffed peppers were ever as good as Granny's.  Once I thought it was because she just had the touch for making them, but then she made them while staying with Mom in Lafayette.  I've decided that it must be the water in Middlesboro that made the difference.  While growing up, the water in Middlesboro came from Fern Lake.  The water had a distinctive flavor that I loved.  The peppers were simple perfection.

I never have stuffed green peppers without thinking of Mom and Granny.  We got to select what we wanted for our birthdays while growing up and I always asked for stuffed peppers.

A better picture with more realistic colors!
Some things that I discovered on my own are that you can use different colored peppers and it does not vary the taste much.  Also, cooked peppers freeze fairly well.  To me, stuffed peppers taste like childhood summertime.  When Dalton was here, I tried to make them, but the ingredients were just so-so, and so the peppers were just so-so.  Next time I will make a pepper believer out of him! 

Update: The homemade chili powder is HOT.  I like it, but it really is hot.  For peppers, I like what I grew up with better, but this is not at all a bad substitute!  I think I might use it in my next chili recipe!

Maybe I will write about cornbread next.  It's time.  

Sunday, July 21, 2013

The Green Bean Team!

Part of the reason for this blog is to remember my mother and grandmothers.  I also wanted to share stories with my nieces and nephew about our family.  The second reason is to share family recipes.  I've been rather lackadaisical in my writing.  It's not for the lack of wanting to write: It's the lack of pictures.  I like pictures.  I'm just bad at taking them.  My birthday just passed, and to celebrate, I made my favorite birthday meal: Stuffed Green Peppers with all of the fixings, which includes southern-cooked string beans.


There are several good stories that surround string beans.  One of my favorites involves my mother.  Her mother, who we called Granny, worked full time after my mother was old enough to be of help around the house.  My grandmother often cooked in a hurry, but one cannot rush good southern string beans.  Granny would start the beans prior to going to work, and then she counted on Mom to babysit them.

The first time my mother babysat Granny's beans, she let all of the water cook out of them and they burned so badly that they had to be thrown away.  The reason given was that she was enjoying playing with the puppies of her brother's hunting dog.  Mom would lay on her bed with the window open and call, "Here pup!  Here pup!  Woop, woop, woop!"  The puppies would dash from the back door to the front door and so the summer day was whiled away.  That night, a pot of burned beans and worn out puppies.

The second time that my mother burned the beans was due to her not wishing to mow the yard.  She put on her shorts and halter top to mosey outside when she knew the boy down the street was outside.  Then she chatted with him while he sweated and did all of her yard work.  This time, she not only burned the beans but she melted Granny's favorite bean pot.  (Never has this wonderful pot been replaced, and no pot created before or since has been up to the fine bean-cooking standards of that poor melted pot.)

The third time that my mother burned string beans was because the electric burner that melted the pot was now damaged.  Remember, Granny cooked fast, so she would toss food at a pan on the stove, push the button for the hottest setting and fry an egg or boil some water.  Granny never noticed an anomaly.  So Granny put on the beans, warned Mom to watch the new pot of beans, and went to work.  Mom decided that these beans had better be perfectly cooked, so she added extra water and reduced the heat before going outside to tan herself and read.  However, the electric burner now only had one setting - hotter than hot.  Again, the water boiled out and the beans scorched to the point where they were inedible.

Green beans were never cooked when both Granny and Mom were within hearing distance that bantering about burned beans did not occur.

Both Granny and our other grandmother, MeMaw, had gardens and grew green beans.  These beans are not like the ones you find in most farmer's markets or the supermarket.  They were big and had colorful beans that would cook out of them.  The flavor was amazing.  I've heard them called a few names, and actually found seeds to try to grow them, but have not grown them yet.  Granny always grew greasy beans.  Memaw always grew cornfield beans.  Both types could be used for shucking and I've heard both types called "shuck beans" and they are good for cooking, drying or canning.

Cornbread, tomatoes, and green beans were always available when anyone came in to MeMaw's house in the summer.  My sister and I started to believe that we would never want beans again, but I've ordered seeds!  I miss breaking beans with MeMaw on her porch.  MeMaw would wear these "Momma-san" aprons made from feed sacks that had all seen better days.  Beans would be loaded into the apron and we would string and break the beans right into the pot.  I don't know how she did it, but MeMaw's beans were always extremely uniform in size, and she prepped beans fast!


Mom could do this really well too.  Granny and I, on the other hand, never mastered this so our beans were always of varying size.  (At least, we could almost guess who broke them up!)


So how to cook them.  Remember, these are southern beans.  There is no term called "tender-crisp" when it comes to good southern beans.  You cook the stuffing out of them, and they beg for cornbread to go with them!

Okay, so get your fresh green beans.  It's nice to pick them, but the farmer's market is fine.  Most beans you find today are "string-less," but if you can find proper shuck beans, break off the end and pull the strings off before breaking up the beans.  If you have shuck beans and you feel one that is leathery, just shell it out keeping the bean and toss the pod.


Wash them well and put them in a pot.  Add water until it covers the beans for about 2 inches (~5cm) and bring them to a boil.  Boil gently for 5 to 10 minutes and drain well.  Return the beans to the pot and add the same amount of fresh cold water.


This is where you will add seasonings - except we never add salt until the end.  You can add pepper, hotshot, a bit of onion, garlic, and some kind of meat or bone for flavoring.  MeMaw had a smokehouse for many years, so she always used things like a smoked ham hock or ham bone.  If using a ham hock, she would slice it up into rounds about 1/2 inch (1.5cm) thick.  (I think she actually had a bone saw to do this!)  Granny would add salt pork, bacon, or even a smoked chicken/turkey wing.  Really, you can use what you like as long as it will yield awesome flavor.  I had bacon on hand, so used about 6 strips but I could have easily made do with 4.  I also simply added black pepper.  Perhaps a teaspoon or so.  No, it does not look tasty at this point. 


Bring to a boil, cover, and let it simmer.  Keep the beans just under water.  Cook for at least 2 hours, but you can simmer it all day if you have proper shuck beans.  I didn't, so 2 hours was plenty.  After 2 hours, add new potatoes, or peeled potato chunks to the bean pot.  (I had new potatoes, so I scrubbed and cut them and left the skins on.)  Just rinse and drop them in and cover again to cook for another 45 minutes or so.


Uncover and let the liquid start to cook down.  You can turn up the heat but don't let the water cook all of the way out!  When the liquid is cooked down, taste a bean and adjust the salt.  (Different meats will require more or less salt.  My huge pot of beans needed about 1/2 teaspoon of salt!)  Remove the meat/bones and fat.  Strip any meat off the bones and fat to return the meat to the pot.  These beans get better and better for the next three days.  One item is needed: Cornbread.


As to which meat is best to use, generational family feuds have been waged on such an answer, so when you decide what you like, you might wish to keep it to yourself.  (I will say that I do not like bacon as well as other things, but these were still pretty good beans!)