Thursday, July 3, 2025

Coleslaw

 I was an adult before I realized that coleslaw was not called "Cold Slaw."  Ah well.  However, even at a very early age, I knew that one of the indicators of a good fried chicken place was having excellent cold slaw....er....coleslaw.  It is true.  Show me a place with subpar coleslaw and I will point out that the chicken is not top notch.  It will either be too salty, too greasy, too overcooked, too undercooked.  I could go on.  So count on good chicken places having good coleslaw.  Also, you will rarely find an outstanding chicken place in a restaurant that has full service with cloth napkins.  I digress.  

The other place where you can find outstanding coleslaw is within our family!  (We also make great fried chicken...and might pull out a cloth napkin!

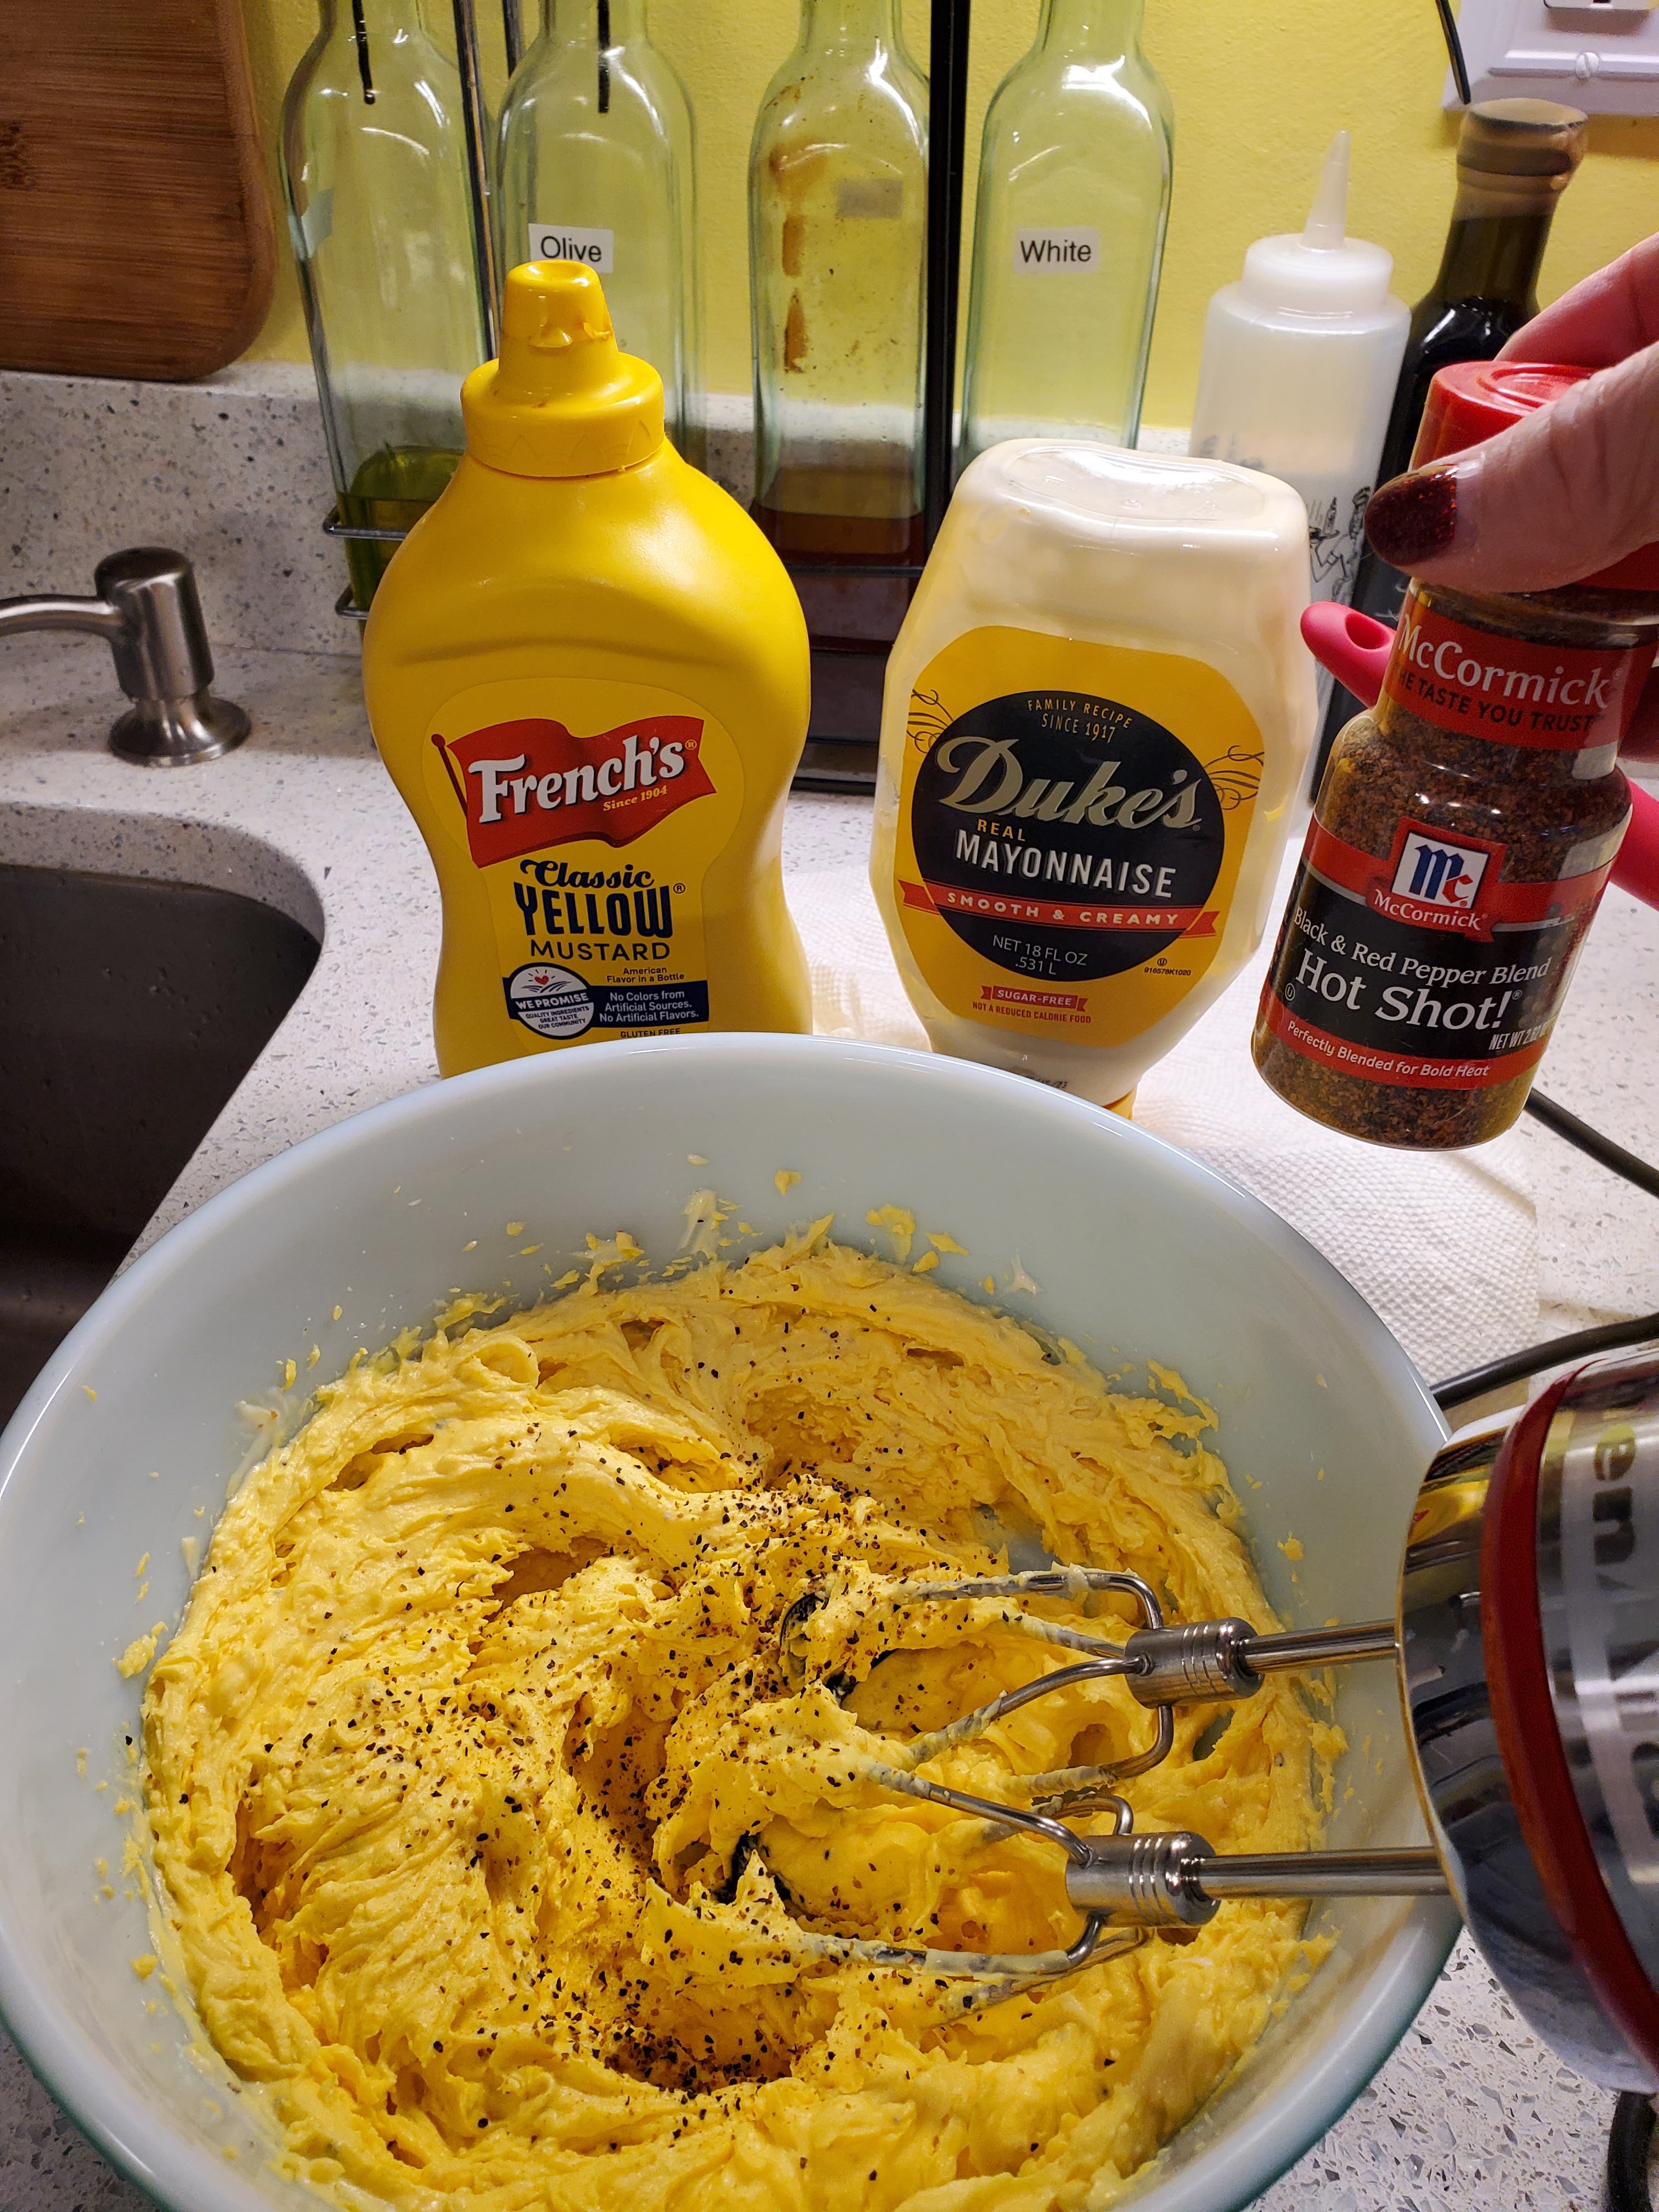
First, we shred our cabbage and then chop it.  Same with some purple cabbage and carrot.  We finely dice some onion.  Then mix together the wet ingredients and seasonings.  Finally, we massage it into the cabbage-carrot-onion mixture.

I didn't have purple cabbage.

Keep in mind that all ingredients are estimated, but I believe you will have a good outcome if you measure it out.

Ingredients:
  • 1 head of cabbage (roughly 6 cups finely chopped) (Some can be purple.)
  • About 1/3 to 1/2 cup of shredded, chopped carrot
  • 2 tablespoons of minced onion
  • 1/3 cup of sugar
  • 1/2 cup of real mayonnaise (Hellmanns or Dukes are both good!)
  • 1/4 cup buttermilk
  • 1/8 cup of milk
  • 1 1/2 tablespoon of white vinegar
  • 2 1/2 tablespoons of lemon juice
  • 1/2 teaspoon of celery salt or salt with a sprinkle of celery seed
  • 1/2 teaspoon of black pepper 
Mix together the sugar, mayo, buttermilk, milk, vinegar, and lemon juice.  Mix the cabbage, carrot, onion, salt and pepper.  Then combine the two ensuring every little flake of cabbage is anointed with the dressing mixture.  It will seem a bit loose.

Just shiny.  

Give it a tiny taste and adjust anything but the onion.  The onion flavor will increase as it sits.


The dressing will settle at the bottom.  You will stir it before serving.

Although I have never done it, I think finely diced celery might be good.  I keep saying I will try it, but never have.  Personally, I like celery salt over the celery seed which can sometimes get bitter.  It's an easy recipe but is so good and keeps well for a few days.  Mom and Granny would argue over the amount of salt, buttermilk, sugar, etc.  It always came out really good.

Root Beer Stands

 As children, going to one of several root beer stands was a huge treat.  Frosty mugs of root beer and sometimes a coney dog was nearly the definition of "summertime" in Lafayette.  In addition to the excitement of going out, we ate in the car!  Nearly magical!  

Of the root beer stands, there was one called Mom's that we could go to on our bicycles.  Though I am certain she had some sort of sandwiches, we generally went there for ice cream or floats.  It was a tiny place with a very small parking area.  I seem to recall that she had one picnic table and that was about it.  As a family, we did not drive to Mom's.  It was a bicycle with friends type of thing.

My favorite root beer stand was called "Pop's."  He had the best coney sauce and also had a sauce that he called "Spanish sauce."  I've never been able to find his "Spanish sauce" recipe, but was able to obtain what is said to be his coney dog sauce.  It's really simple to make and freezes pretty well.  With Pop's sauce, you dump everything into a pan and simmer it for an hour.  That's it.  So what do you simmer?  Here is the list:

  • 1 pound of lean ground beef
  • 2 Tablespoons onion, finely diced
  • 1 cup of Hunt's ketchup
  • 6 Tablespoons. of water
  • 2 Tablespoons white vinegar
  • 2 1/4 teaspoons of chili powder
  • 1/2 teaspoon of salt
Dump it in the pan and simmer for an hour.  Easy.

Starting to simmer.  No, the onions are not diced.  I got lazy.

Dogs-N-Suds was the third root beer stand where we would go.  Mom loved their fried mushrooms and Dad enjoyed their hotdogs.  We loved getting footlong hotdogs because they were FOOTLONG hotdogs.  (Cannot get those at home!)  We have gone to other Dogs-N-Suds as it is a chain, but the coney sauce never tasted the same.  Again, after asking around, I was given this recipe that is more like what we would get as children.

  • 1 pound ground beef
  • 2 tablespoons prepared mustard
  • 2 tablespoons sugar
  • 1/4 teaspoon tabasco sauce
  • 1 small onion, finely chopped
  • 2 tablespoons vinegar
  • 1 tablespoon water
  • 1/4 teaspoon celery seed
  • Ketchup....a few squeezes or plops 
Brown ground beef with onion over medium heat breaking up the meat with a fork to crumble it fine.  Drain off fat.  Add everything but the ketchup.  Mix well.  Add enough ketchup to keep the mixture loose.  Simmer partially covered for 1 hour, adding ketchup as needed.  Makes enough sauce for 6-8 regular hot dogs.

Which is better?  You tell me!  You must have a root beer to go with your dogs in either case.  Dogs-N-Suds had A&W root beer.  Not sure about the other two but they certainly were terrific.  

I like mine with mustard and onion!


Wednesday, June 11, 2025

Doc's Crab Soup & Shrimp Salad

I have a photo of Don "Doc" Thornton making his excellent crab soup.  When I moved to Baltimore, Doc was one of the first people I met.  He was like the younger brother I never had in that he was fun to be around, was very protective of people in his life, and could be a hot mess when left unsupervised.  Doc was an excellent musician, and I miss playing my bass with him.  He had a lot of interests and talents which included making crab soup.  One thing that helped him out was that he could pick a crab faster than anyone I've ever met.  Doc was chosen family for me.  He died instantly in a motorcycle accident.  

Doc's soup started from his mother's recipe.  It was good soup, and Doc could eat it hot or cold.  This recipe improved it, which made him quite proud.  I've never had better crab soup!

After eating blue crabs, pick out a couple of cups of crab meat to refrigerate until it is used for the soup.  While picking, collect the back shells, legs and anything inedible for a stew pot.  We would put celery leaves and cut an onion to add to the stock.  Leave the seasonings, etc.  Cover the shells with water and bring to a boil.  Then simmer for several hours.  


Once several hours (like 4 or more) have passed, drain the shells and debris from the liquid stock.  It can be further strained using mesh or cheesecloth, if desired.  


Using a strainer is a huge help.  Discard shells.


Taste the stock.  Doc would generally add a heaping tablespoon of Beef Better-Than-Bouillon, a diced potato or three, some okra, a package of frozen mixed veggies, a bit of finely diced onion and celery, and a bit of spicy V-8. (Doc's mother used several cans of Beef Vegetable soup.)  


I have even added a handful of cabbage slivers.  Bring to a boil and simmer until the potatoes are done.  Give the broth a taste and adjust seasonings and salt.  (Doc used Old Bay.  I see no reason to muck with perfection.)  Skin the soup, if needed.


Add in the picked crab and stir into the soup.  Let simmer for another 5 to 10 minutes.  Serve!

Need something else to go with it?  It pairs well with Doc's shrimp Salad.  (This really is his mother's recipe unchanged.)

Shrimp Salad:

This is easy to make, keeps well in the refrigerator, and travels well.  


Dice a three or four green onions, a large bell pepper, a cucumber, and sprinkle liberally with celery seed.  One can also use a stalk or two of celery instead of celery seed if desired.


Remove the shells and any dark veins from a pound or two of steamed shrimp.  


Roughly chop the shrimp into bite-sized pieces or a bit smaller if you want to eat the salad on a sandwich.  


Add Old Bay, mayo and mix well.  Chill until you are ready to eat it if you intend to use it for wraps or sandwiches.


Add pasta and a bit more Old Bay and mayo if it is to be a stand-alone salad.  It keeps well for picnics if kept chilled or will keep well for multiple days in the refrigerator.  Very tasty.

I do think of Doc whenever I make either.  Two of my favorite recipes and I never would have had them if Doc were not part of my life.

Sunday, January 19, 2025

Our Greek Momma's Stuffed Grape Leaves!

Okay, we do not have a Greek mother, grandmother, or even a Greek great-grandmother, but these grape leaves (dolmades) are so good that you could fool anyone. Stuffed grape leaves are generally expensive when bought at a restaurant and, if they are actually made on-site, they will be even more expensive. 

Stuffed grape leaves seem complicated, but are actually very easy to make even though the prep time and total times seem long. Prep will take about an hour. The total time is about three hours, but most of that is hands off cooking. 

For a main course, this will feed 4 to 8 people. It depends on how many sides you have to go with it.
 
To make this dish, you will need a 2-pound jar of grape leaves. 

Simply remove the grape leaves from the jar, flattening them out. There is no need to rinse.

Trim off the tough, little stems. Any torn, broken, or damaged leaves will be used to line the bottom of the large pot that will be used to cook them.  Also, there is a layer of leaves to cover the top as well. 
For the broth, you will need 2-cups of chicken broth (Better-Than-Boullion works) and the juice of a large lemon.
For the filling, you will need: 
  • 1 cup of uncooked long-grain rice 
  • 1/2 cup of good olive oil (if it smells off, go get fresh olive oil otherwise this dish will taste off) 
  • 1 large yellow onion, finely diced 
  • 2 cloves of garlic, crushed 
  • 1/2 cup of fresh chopped flat-leaf parsley or 1/4 cup of dried
  • 1 tablespoon dried dill or two tablespoons fresh minced 
  • 1/2 teaspoon of dried mint 
  • 1 teaspoon allspice 
  • 1 pound of very lean ground meat (lamb, beef, or a combination. I use lamb.) 
  • 1/2 teaspoon salt 
  • 1 teaspoon black pepper
  • 1/4 cup lemon juice
  • 2 cups chicken broth
  1. Mix all but lemon juice and chicken broth together well. (I usually mix the lamb in last.) 
  2. Using leftover or damaged leaves, line the bottom of a pot with a single layer of grape leaves. 
  3. Once you have everything mixed up, your grape leaves are stem-free, and you have lined the bottom of the heavy bottom pot with one layer of leaves, you are ready to assemble. 
  4. Place a leaf with the bottom toward you and place a heaping teaspoon of filling on the leaf, then fold the stem end over, each side in, and then roll. 
  5. NOTE: Do not fold them too tightly because the rice needs to expand as it cooks.  The rice will be hard if they are bundled too tightly.
  6. Put the stuffed leaves into the pot with the seam-side down.
Plunk.
Fold up the bottom.
Fold right.
Fold left.
Roll it up pretty.
Put the bundles in the pot. Place them seam-side down.
You will have multiple layers. Don't align them, but crisscross the layers.  You do not add more loose leaves between layers.
  • Cover the top layer with a single layer using unused or faulty grape leaves. You can place a weight on top if you feel it needs weighed down.  (I have never had to do this.)
  • Pour the lemon juice and chicken broth over the leaves. If your stove cooks hot at a simmer, add an extra 1/2 cup of broth. 
  •  Cover the pot and bring to a light simmer. Cook for 1 hour without lifting the lid.
  •  Without removing the lid, remove from heat and allow to cool for 1 more hour. Call your auntie while waiting. 
Serve with Egg-Lemon Sauce over the grape leaves. To make this, you will need: 
  • 1 to 2 cups of chicken stock or pot liquid 
  • 2 tablespoons of butter 
  • 2 tablespoons of flour 
  • 2 eggs 
  • 1-3 lemons, juiced 
  • salt to taste 
  • white pepper to taste. 
  1.  Heat the stock until just warm. 
  2.  Melt butter and add in flour. 
  3. Whip eggs, stock and lemon juice in a bowl until frothy. 
  4. Add egg mixture to the butter/flour mixture and stir until thickened. (It should be thick enough to glaze over the leaves when used or coat a spoon, but it should not be so heavy that it clings in opaque clumps.) 
  5. Adjust using flour or stock. 
  6. Don't boil the mixture but stir until thickened and you no longer taste flour. 
  7. Adjust salt and pepper seasoning to your liking.
  8. Hint: The sauce should coat a spoon but not glob onto it.
This goes great with a Greek Village Salad, which is red onion, green pepper, olives, cucumbers, tomatoes and feta. Mix up a good oil and vinegar salad dressing. Pita bread is also delicious as it can be used for the remaining sauce!
So where did I get this recipe? From our loving Yia-yia, of course! Καλή όρεξη!

Thursday, January 19, 2023

Wickedly Good Egg Salad

I love sandwich salads such as tuna and chicken salad. I absolutely adore great egg salad but rarely found a place that made it well. My friend Jennifer, who we call Jai, worked at a small diner. I went to visit her and she told me that the daily special was egg salad. I was skeptical, but she assured me it was good. It was good! In fact, it was SO good that I begged her to find out how they made it. All egg salads start with hard-cooked eggs, but there was a trick to this wonderful egg salad.

First, only use Duke's mayonnaise. (Yes, I know that family feuds have started over which brand is best between Hellmanns and Dukes. Just so all know, I have always been a Hellmann's advocate. so I had to purchase a jar of Dukes to followed Jai's instructions.)

1. Whip the cooked yolks with Dukes mayo. One can add as much or as little mayo to the yolks as blending with the egg whites will not change anything but the consistency of the salad. I personally like my egg salad to be on the thicker side, but it is a matter of preference. After making it, I decided to add a healthy squeeze of plain yellow mustard and a few shakes of HotShot. (The little diner did not do this.)
2. Chop hardcooked egg whites to the sizes desired. The little diner used an egg slicer to get more uniform egg whites. I am waffling on whether I like the larger chunks or want to slice them and chop with a knife.

3. Blend together.
The result is the Wickedly Good Egg Salad that I have been seeking for years! Yesterday, Jai said I had been grumpy. Anyone would be grumpy for not having this recipe for most of their life! But here it is so no one else needs to be grumpy.
I like my sandwich on untoasted oat or wheat bread with fresh tomato slices. Wickedly. Good.

Thursday, October 27, 2022

Liver and Onions

I thought that I would begin with a photo since I know that most of my family will turn their button-noses up at Liver and Onions. Too bad, because it is delicious! While Dad simply tolerated it, Mom and I loved it. Sandy was not a fan, so she managed to avoid it when it was on the dinner table. Not sure how she did it, because I thought the rule was we could only refuse three foods....so one should pick carefully!
For really good liver and onions, it starts with finding really outstanding calves liver. This will not be found in a liver-shaped package in the freezer section. I prefer the liver to be sliced one-half or (a bit over inch) thick. If calves liver cannot be found, then beef liver will need to do, but it will not be as fantastic. (This being said, our beef liver will be better than 99% of the fine restaurants who make it.) For each pound of liver, use two medium onions. If using beef liver, soak it in milk for the duration of slicing the onions and preparing a skillet to brown them. Once soaked, transfer the liver pieces to paper towel and dry them well! If using calves liver, just put the slices on paper towel and dry the surface.
Using a heavy skillet (like cast iron,) heat some oil to saute the onions until they get some carmelization. If using castiron, heat the skillet before adding oil. When the oil shimmers, add the sliced onions.
While the onions are cooking, mix up a coating. Mom liked to use cornmeal/flour (50/50) with salt and pepper. I like flour without the cornmeal along with salt and pepper. Use a second paper towel to dry the liver, if needed.
Remove the onions from the skillet and add a bit more oil, if needed. Then dredge the liver in the flour mixture and brown them in the skillet. It will cook quickly, and should not stick if the skillet is hot and has been seasoned.
While the liver is browning, mix up the gravy base. I use beef broth (or Better than Bouillon), a splash of Worcester Sauce (or fish sauce and a small squirt of lemon- trust me on this,) more pepper, and flour. (A tablespoon of flour for each cup of liquid.) Remove the liver. I use red wine (cabernet sauvignon) to deglaze the skillet but Mom used water or broth. Deglazing makes clean-up easier and adds flavor. Add the gravy base and cook until the gravy is thickened and bubbly. Add the liver back to the skillet coating each piece in gravy and add onions on top coating them as well.
Cover and turn pan to a simmer for 5 to 10 minutes.
Serve with mashed potatoes and applesauce for a truly delicious dinner....and join Mom and me in loving liver!

Tuesday, July 20, 2021

Summer Pickles

I will be the first to admit that I am a neglectful auntie in posting family recipes. It really is because I want to have photographs to add to the recipes and, of course, my limited time. I'll get better - eventually. Summer pickles are also called "refrigerator pickles" in our family. Mom use to make them a lot when she got extra cucumbers or when she simply wanted an easy side dish. These go over well at potlucks. I do not remember Granny or Memaw making them, but understand that Grandma Dora made them often in the summer time. I grow cucumbers in my little Victory Garden. While I love cucumbers, I also love these pickles, which will keep a week or so in the fridge!
The basics are the same: Cucumbers, Sugar, White Vinegar, and Water. Beyond that, everything is a variation. Do you like sour pickles? Use more vinegar and less sugar. Like other flavors, add them. I personally like a 1 sugar: 1 water : 1 vinegar ratio. So a cup for a cup. (To do this, I sometimes need to heat the water to dissolve the sugar. Let it cool before using.) This will make a crunchy pickle that is on the sweet side. I put them on sandwiches as well as use them as a summer side dish. Just mix it all together and let it rest in the refrigerator overnight. It also seems to work find when made in the morning for dinner that evening.
In addition to the ratios and slice sizes, there are tons of variations to these pickles. I'm partial to adding dill. I like adding sweet onion as well. Red onion is tasty but will turn the water pink, which I do not particularly like. Today, I added a shallot, some sliced garlic cloves and a teaspoon of dried dill along with the sugar, water, and vinegar mix.
As a child, we only had these pickles in the summer. Regular cucumbers in the winter were simply not as good. However, they are delicious anytime of the year using the English cucumbers. One huge change between when I was growing up and now is the availability of produce through the year. Although I can select to do so, it is not the same to eat "seasonally." Getting strawberries from the green grocer or the local fruit stand was a treat as the berries were locally ripened and likely picked that morning. I'm really looking forward to my summer pickles as these were picked this morning right off their vines.